Hello again! So I'm back after a little time off. As I mentioned in my first post I work for an event company so we've had TWO events back to back. Now we're preparing for another coming up soon so not much free time these days. HOWEVER, I've been a little busy bee crafter and have made some serious improvement in the "DIY World."
Yesterday I posted my recent project on Instagram and it didn't take long for it to blow up as a favorite! With much researching from other tutorials I present to you all my
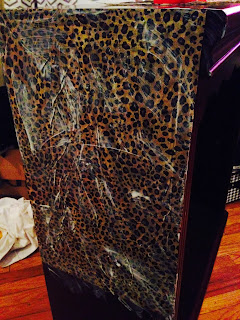
Tissue Papered Mini Bar!
This all started with me completely revamping my new place. I just moved
into my new New York style apartment in the heart of Five Points in Birmingham.
This is my first place with no roommates so I had every intention to go crazy
with it. Each room has a theme and you all will learn my kitchen is the
"Anything Goes," room. If I find a crazy furniture piece or weird art
it's going in there somewhere. With that being said, I've been patiently
thrifting around for something to turn into a mini bar. When you move out on
your own you somewhat become a hostess to anyone! So, why not make a fun eye
candy for your guest?
The first step was the bar. This was the hardest part for me. I hadn't had
much luck witht he thrift stores and Target had an awesome one that was half
off $100 :( Which $50 isn't THAT terrible but still wasn't what I wanted to
spend. Fast forward to two weeks later a co-worker is moving and selling
EVERYTHING in her house. JACKPOT!
She had two really nice mini
bookshelfs that were still in pretty good condition so I gave her $25 for one
and was on my way! This project calls for:
Furniture
Mod Podge (Gloss)
Sponge Brushes
Tissue Paper (I bought 4 packs only realizing after I needed 1. They were only $2 so I'll return the others!
1. Find a pattern that is semi busy or a solid. The tissue paper or napkins
(which can also be used. Use one layer of by the way) will rip and tear from
the Mod Podge. Once it dries you won't be able to tell, especially with a busy
pattern like leopard.
2. Before you do your first layer of Mod Podge make sure
there's no dust or anything that may get stuck under it. There's going to be a
few bubbles and ripples so the less the better.
3. Now I did the sides first so I measured how long and wide
of pieces I would need. It's not a serious deal if it isn't perfect. I promise!
Now Mod Podge that baby down!
4. Now that we got that first layer down, you're pretty much
a professional. Keep it moving to other areas. Let it dry and go back all over
it again with Mod Podge so we can make sure all of the edges are sealed. DON'T
CUT CORNERS! Squeeze into the ridges if you some, it will make your final
product look even more store bought!
See I wouldn't steer you the wrong way, look how good that
Mod Podge Gloss looks!
5. Now if you want you can add some lights for a night
party. And gradually add any bar items and alcohol you get overtime!
 |
| Instagram - @DanyellKneecoal |
Follow me on Instagram which is where I will be posting new projects I'm working on around my apartment! I hope you all enjoy this as much as I did. It definitely is my new conversation piece whenever someone comes over now! Please comment below with any feedback or questions!
Tootles :)


I really love this project, it turned out so well!!
ReplyDeleteThanks Vett! It was super easy and fun to do. Definitely my new baby in my kitchen!
DeleteWhere did you get the tissue paper in packages? I'm having a tough time finding them in craft stores.
ReplyDeleteSorry for the EXTREME late response. I've been on a major hiatus, they were from Hobby Lobby!
Delete